Pre-Registration
The Pre-Registration feature allows organisers to send meeting invitations in advance to people who will be coming onsite, complete with all necessary site details. This lets attendees enter their information ahead of time and view and acknowledge health and safety information, helping to make their sign-in faster. It also provides key details such as site maps and directions, ensuring they are well-prepared for their visit.
When someone is invited to pre-register, they receive an email containing a link to their personal pre-registration page. This page provides all the information they will need for their visit, including access to their unique QR code which they would scan upon arrival to sign in.

Pre-Registration must be set up and enabled for your site before it can be used, and requires the appropriate VisitorRego software licence tier. If you are unsure whether Pre-Registration is enabled for your site, or if you would like it set up, please contact the VisitorRego support team.
How to Create Pre-Registrations: Inviting Attendees
Pre-registrations can be created using one of two methods. Both methods result in the same type of pre-registration email being sent to the person being invited, containing their unique QR code and all necessary site information.
1. Using VR Portal — create meetings directly from the Pre-Register page in VR Portal.
2. Using Outlook — create meetings in Outlook to send a pre-registration invitation.
Each method has its own steps and considerations, which are outlined in the sections below.
Using VR Portal
1. Using your web browser, navigate to website https://p.visitorrego.com/ and log into VR Portal.
2. Hover over PreRegister in the left-hand navigation menu and click PreRegister from the dropdown.
3. Click the Add Meeting button to open the New Meeting window, where you can enter the meeting details and attendees.
4. Enter the attendee’s name in the Attendee Full Name field.
As you type, any people who have been pre-registered before and match the name will appear below the field. Clicking on a match will automatically add that person as an attendee.
5. Enter the attendee’s email address in the Attendee Email Address field.
6. Click Add Attendee to add the person to the attendees section on the right-hand side of the window.
Repeat for each additional attendee you wish to include in the meeting.
7. Enter the meeting subject in the Meeting Subject field. This is a required field and will appear as the subject line in the email invitation.
8. Enter the meeting room in the Meeting Room field (optional).
9. Set the date and time for the meeting by clicking the Start Date/Time field. Use the calendar to pick the meeting date, then select the hour and minutes from the time picker that appears.
10. Once all meeting details and attendees are entered, click the Submit Meeting button to finalise the pre-registration.
After submitting, the meeting will appear in the Meetings List and on the Meetings Calendar, showing all scheduled pre-registration meetings for your site. The system will automatically send each attendee a pre-registration email containing a link to their personal pre-registration page.
Using Outlook
1. Open Microsoft Outlook and switch to the Calendar view.
2. Click New Meeting (or New Event, depending on your version) to open a new meeting window where you can enter the meeting details and attendees.
3. Enter the meeting subject in the Title field. This will appear as the subject line in the pre-registration email invitation.
4. Add the attendees’ email addresses in the Required (or Invite attendees) field.
5. Include PreRegister@visitorrego.co.nz as one of the attendees.
Including PreRegister@visitorrego.co.nz is what allows the VisitorRego system to recognise the meeting as a pre-registration.
6. Set the start date and time and end time for the meeting using the corresponding fields.
7. Once all meeting details are entered, click Send to send the invitation.
The system will automatically send each attendee a pre-registration email containing a link to their personal pre-registration page. Attendees will also receive the normal Outlook meeting invitation.

Requirements to use Outlook Pre-Registration
- You must be listed in the staff list for the site you want to send the pre-registration for.
If you are listed in the staff list for multiple sites:
- You need to set the site you want to send pre-registrations for as your default site.
- To do this, you must have a VR Portal login for that site. Your site administrator can create this login if you do not already have one.
- After logging into VR Portal for the relevant site, use the Default Site toggle at the top of the page to set it as your default. Move the slider so it shows a tick.
- If your login has access to multiple sites, you can switch between them by hovering over the Sites button near the top left of the page, selecting the correct site, and then using the Default Site toggle to activate it.
Attendee Pre-Registration Process: Invitation to Visit
Receiving the Invitation
When an attendee is invited via Pre-Registration, they receive an email from VisitorRego containing:
• The name of the host.
• The meeting date and time.
• A Sign-In button that links to their personal Pre-Registration page.
• The host’s email address for any questions regarding the visit.
• The meeting date and time.
• A Sign-In button that links to their personal Pre-Registration page.
• The host’s email address for any questions regarding the visit.
The attendee must click the Sign-In button to access their personal Pre-Registration page and begin the process.
Accessing the Pre-Registration Page
Clicking the Sign In button opens the personal Pre-Registration page, where the attendee can complete their registration and access essential site information.
First-Time Pre-Registrants
If this is the attendee’s first time on site, they will need to enter their registration details. These details are used for signing in when they arrive onsite and scan their QR code. The registration fields include:• Full Name
• Email – pre-populated and locked for editing
• Company
• Mobile Phone
Once all required details are entered, they click the Proceed button to access the Pre-Registration Index page.
Returning Pre-RegistrantsAttendees who have been pre-registered previously, or have signed in at a VisitorRego unit using the same email address, are taken directly to the Pre-Registration Index page without needing to re-enter their registration details.
Pre-Registration Index
The Pre-Registration Index provides access to all the information attendees need for their visit. It presents a menu of options for the attendee to interact with before and during their visit.

The menu may include the following options:
Sign-In: Selecting this option opens a page displaying the attendee’s unique QR code, which they can scan upon arrival at the VisitorRego unit to sign in.
The menu may include the following options:
Sign-In: Selecting this option opens a page displaying the attendee’s unique QR code, which they can scan upon arrival at the VisitorRego unit to sign in.
- If the attendee has already viewed and accepted the required health and safety information (accessible via the Health and Safety button, described later in this section), scanning the QR code will complete the sign-in immediately.
- If they have not yet accepted the health and safety requirements, the information will appear after scanning and must be acknowledged before sign-in is completed.
- Once sign-in is completed, email and/or SMS notifications will be sent to the staff member who created the pre-registration.
- The same QR code can be scanned at the unit upon departure to sign out.
Health and Safety: Selecting this option opens a page displaying your company’s site-specific health and safety information. Attendees are able to view this information and acknowledge it by clicking the Accept button.
Acknowledging the health and safety information in advance ensures a smoother sign-in process.
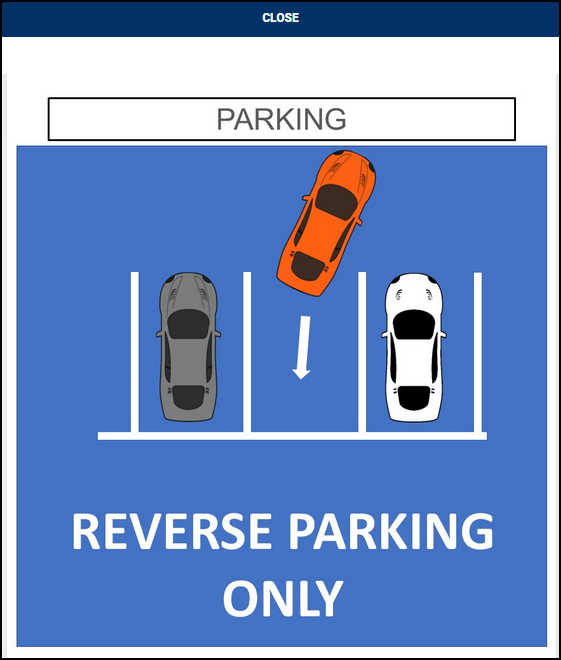
Parking: Selecting this option displays parking information for the site. This may include a map of parking areas and any site-specific parking instructions.
Wi-Fi: Selecting this option can display details for connecting to the site’s guest Wi‑Fi network, including the network name (SSID) and password.
Site Map: Selecting this option opens a page displaying the site layout and directions. Attendees can use this to familiarise themselves with the site and locate important areas such as entrances, exits, emergency assembly points, and other key locations.
Directions: Selecting this option opens a Google Maps view with your site location marked, helping attendees easily see where the site is.
Help: Selecting this option provides direct contact options for the staff member who created the pre-registration, including buttons to phone or email them.
Signing In with the QR Code
Upon arrival onsite, attendees can scan their unique QR code, displayed on the Sign-In page of the Pre-Registration Index, at the VisitorRego unit QR code scanner.
• If the attendee has already viewed and accepted the required health and safety information, scanning the QR code will automatically sign them in and send notifications to the staff member who created the pre-registration.
• If the health and safety information has not yet been accepted, it will be displayed for review after scanning. Attendees must acknowledge it before the sign-in is completed, after which notifications will be sent to the staff member who created the pre-registration.
• If the health and safety information has not yet been accepted, it will be displayed for review after scanning. Attendees must acknowledge it before the sign-in is completed, after which notifications will be sent to the staff member who created the pre-registration.

Attendees can also use a screenshot of their QR code on their mobile device for scanning, which avoids having to open the Sign-In page at the time of scanning.
Optional handling features available:
- Printing a label upon sign-in, useful if attendees are required to display identification while onsite.
- Disabling notifications for all pre-registrations, which prevents staff notifications from being sent when any pre-registered attendee signs in.
These options can be configured through System Setup in the VisitorRego software.
Managing Pre-Registrations in VR Portal
In VR Portal, the PreRegister page provides two ways to view and manage your pre-registered meetings: the Meetings List and the Meetings Calendar. Both display the same meetings in different formats and allow you to open, edit, or remove any meeting as needed.
Meetings List
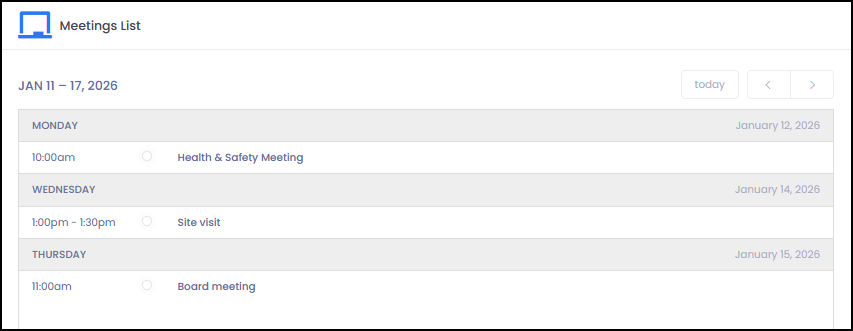
The Meetings List displays all pre-registration meetings, grouped into weekly date ranges. You can move backward or forward through these ranges using the left and right arrow buttons located in the top-right corner of the Meetings List. The Today button returns the view to the current week.
Each weekly range lists the meetings within that period, organised by day and shown in chronological order. Each entry displays the meeting time and meeting name. Selecting any meeting opens its details, allowing you to review, edit, or remove the meeting as needed.
Each weekly range lists the meetings within that period, organised by day and shown in chronological order. Each entry displays the meeting time and meeting name. Selecting any meeting opens its details, allowing you to review, edit, or remove the meeting as needed.
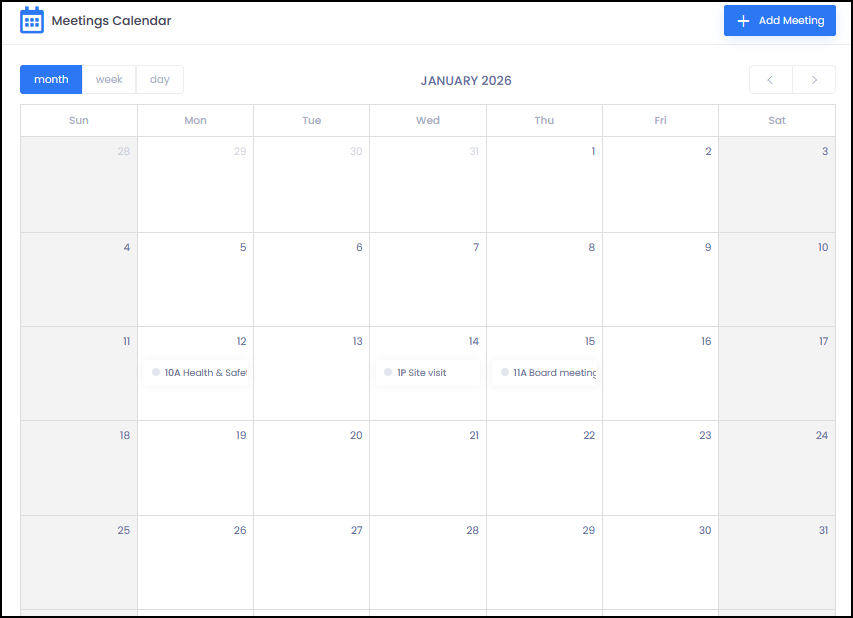
Meetings Calendar
The Meetings Calendar displays all pre-registration meetings in a visual calendar layout. You can switch between month, week, and day views using the buttons above the calendar.
Use the left and right arrow buttons in the top-right corner to move backward or forward through the current view. For example, in month view the arrows move between months, and in week view they move between weeks.
Meetings are shown within their scheduled date and time. Selecting a meeting opens its details, allowing you to review, edit, or remove the meeting as needed.
Editing Meetings
Pre-registration meetings can be edited at any time through either the Meetings List or the Meetings Calendar. To edit a meeting:
1. Locate the meeting you want to edit, either in the Meetings List or in the Meetings Calendar.
2. Click the meeting to open its details.
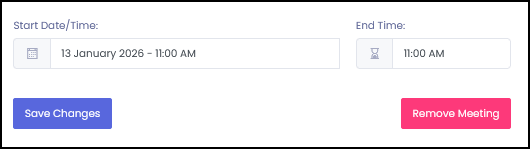
3. Update the relevant information, such as the meeting subject, date, time, or attendees.
4. Click Save Changes to apply your updates.
Any changes made to a meeting will be reflected in VR Portal immediately. If new attendees are added, they will receive a pre-registration email invitation. Other changes, such as updates to the meeting subject, date, or time, will be reflected in VR Portal but do not trigger additional emails.
1. Locate the meeting you want to edit, either in the Meetings List or in the Meetings Calendar.
2. Click the meeting to open its details.
3. Update the relevant information, such as the meeting subject, date, time, or attendees.
4. Click Save Changes to apply your updates.
Any changes made to a meeting will be reflected in VR Portal immediately. If new attendees are added, they will receive a pre-registration email invitation. Other changes, such as updates to the meeting subject, date, or time, will be reflected in VR Portal but do not trigger additional emails.
Removing Meetings
Pre-registration meetings can be removed at any time through either the Meetings List or the Meetings Calendar. To remove a meeting:
1. Locate the meeting you want to remove, either in the Meetings List or in the Meetings Calendar.
2. Click the meeting to open its details.
3. Click Remove Meeting.
4. A confirmation window will appear with the message:
• Click No, cancel! to abort.
• Click Yes, remove! to confirm.
Once removed, attendees who click the Sign-In button from the original pre-registration email will see a message stating that the meeting has been cancelled, along with a link to contact the meeting organiser.
Related Articles
PreRegister tab
The PreRegister tab in VR Portal gives users access to two options for preregistering guests which are PreRegister and RSVP. Access the PreRegister tab 1. Using your web browser, navigate to website https://p.visitorrego.com/ and log into VR Portal. ...Quick Sign-In Options
VisitorRego provides several alternative ways for people to sign in and sign out of a site without needing to complete the full sign-in process each time. These options are designed to speed up repeat visits, reduce manual data entry, and improve ...QR code sign-out
Simplify the sign-out process with VisitorRego's QR Code Sign-Out feature. Leveraging QR code technology, guests receive a printed personalised label embedded with a unique QR code upon registration. Effortlessly sign out by scanning the QR code when ...Pre-registration Appointments
Pre-registration facilitates hassle-free visitor sign-in by allowing individuals or groups to complete registration remotely before their visit. Hosts can send meeting invitations using VR Portal or Outlook, providing visitors with all necessary site ...Signing in using the Contactless Sign-In function
Contactless Sign-In allows visitors to sign in using their own smartphone instead of interacting with the VisitorRego unit’s touchscreen. A unique QR code is displayed on the unit’s welcome screen, which visitors can scan using their smartphone’s QR ...