Authorised Individuals
The Authorised Individuals page displays the data of all individuals who require authorisation to be onsite. Individuals can be added and authorisations can be assigned and certified.
Access Authorised Individuals
1. Using your web browser, navigate to website https://p.visitorrego.com/ and log into VR Portal.
2. Hover over Authorisations  in the navigation menu on the left.
3. Click on Individuals in the Authorisations menu.

If your VR portal login has access to more than one site you will be able to toggle between sites using the site selector drop-down field.
To switch sites, click on the Sites drop-down field at the top left of the page, then select which site you wish to maintain.
Adding an Individual
1. Click on the button  to add an individual. The Add Individual window will appear.
2. Enter the details of the individual.
The most important details to enter would be the individuals First Name, Last Name, Organisation and Email address.
The same email addresses cannot be used for more than one individual. The email address is the unique identifier.
If the individual does not have their own email address, VisitorRego will generate a placeholder email address automatically when saving.
For individuals who don't have their own email address but still need an invitation email sent to complete a questionnaire, a secondary email address can be entered into the Email Contact field. This could be the individuals manager for example.
3. Click on the Save button to add the individual.

If the individual has previously signed in through your VisitorRego system, it will automatically recognise this based on their sign-in history and display a prompt to confirm their identity.
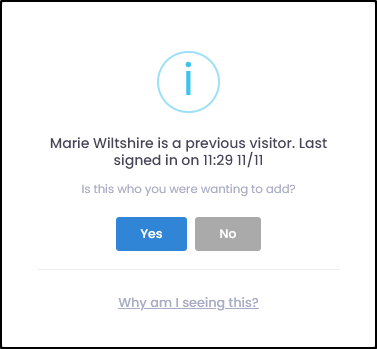
This helps avoid duplication and streamlines the process. by recognising previous visitors based on their name and registration history. The system will display the popup if it detects a potential match, allowing you to confirm if the individual is the same person who has visited the site before.
Assigning an Authorisation to an Individual
1. Click on the icon in the fit column for the individual you wish to assign an authorisation to. The authorisation window for the individual will appear.
The icon can appear as a white box  , a tick
  , a keep out symbol
  or a red x symbol
  depending on the authorisation status for that individual.
2. Click on the button  to assign an authorisation.
3. Select the workflow(s) or authority(s) that are to be assigned to the individual.
Workflows can consist of one or more Authorisations as a package that can be assigned to individuals.
If there are no workflows available to select, then there has not been any added yet.
Authorisations can be created and added to Workflows on the Authorisation Templates page. Refer to the How to add Authorisations to a Workflow article for instructions to add authorisations to workflows.
4. Click on the Save button to assign the workflow(s) or authority(s).
At this point, depending on how the authorisations were set up, the individual will be automatically certified, or require action to manually certify.
If the individual has a red x symbol in the fit column, the authorisation(s) they have assigned will need to be manually certified, or certified automatically after the individual completes a questionnaire (if applicable). If they have a green tick icon in the fit column, they are already certified.
For instructions to manually certify an authorisation, skip to the Certifying an Authorisation section.
Authorisations can be set up to be automatically certified when assigned to an individual. When an authorisation is not setup to be automatically certified, an administrator needs to manually certify the authorisation for an individual. See the Certifying an Authorisation section for instructions to manually certify an authorisation.
If a questionnaire is included as part of an authorisation, the individual will need to complete the questionnaire in order for the authorisation to be certified. The questionnaire can be viewed and completed by the individual through the My Sign-in web app via the onboarding email that is sent.
For instructions and information on the various ways of how authorisations can be set up, please refer to the Authorisation Templates knowledge base article found here.
Sending an invite to an individual so that they can complete an Authorisation questionnaire
If a questionnaire is included as part of an authorisation, the individual will need to complete the questionnaire in order for the authorisation to be certified. The questionnaire and any PDF documents associated with an authorisation can be accessed by the individual through the invitation email that can be sent by following the steps below.
1. Click on the icon in the fit column for the individual you wish to send an invitation to. The authorisation window for the individual will appear.
2. Click on the Send Invite button.
3. Click Yes, send when prompted to send the invitation email.
The invitation email will be sent to the individual if they have a valid email address assigned. If the individual does not have a valid email address but has a valid email address assigned in the Email Contact field, the email will be sent to the email contact.
Within the email, there is a Welcome link which will open a web page. The individual would then select Authorisations to complete the questionnaire.
The individual can also view any PDF documents associated with the authorisations assigned to them and can upload any documents that are required as proof.
Once the individual has opened the questionnaire, they must answer all questions correctly for the submit button to appear. Once submitted, the authorisation will be automatically certified if the authorisation has the Auto Certify Questionnaire option checked. If the Auto Certify Questionnaire option is not checked, the authorisation will need to be manually certified.
To view a submitted questionnaire, click on the icon in the fit column for the individual who completed the questionnaire, then click on the  icon in the Response column.
Certifying an Authorisation
1. Click on the icon in the fit column for the individual you wish to certify. The authorisation window for the individual will appear.
2. Click on the name of the authorisation that is to be certified. The authorisation window for the authorisation and individual you are wanting to certify will open.
3. Enter the Certified On date, or click the Today button on the right to fill the field with today's date.
4. Enter the expiry date for the authorisation into the Expires field, or click the 12 Months button to fill the field with the date 12 months from today's date.
If a PDF document or image needs to be uploaded to support the individuals authorisation certification, click the Upload PDF button. A photo can also be taken and uploaded using you PC's webcam by clicking on the Take Photo button.
5. Click on the Certify button to certify the authorisation for the individual.
If the individual has more than one authorisation assigned, repeat the above steps to certify each authorisation.
Once all authorisations are certified, the icon in the fit column for the individual will change to a green tick  to indicate that they are now fully certified.
Maintaining an existing Individuals details
To maintain an existing individuals details, click on the name of the individual you want to make changes to. The individuals profile window will appear allowing you to freely edit the details.
Once the changes have been made, click the Save button to hold the changes.
Individuals can be deleted from the Authorised Individuals page by clicking on the rubbish bin icon on the very right of each row.
To avoid potential sync or data issues, make sure the individual is not currently signed in when editing their details. If an individual is signed in at the time of editing, their record may not update correctly.
Recertify an Authorisation
When an authorisation is due to expire or has already expired and needs to be recertified, you can update the authorisation's expiry date and recertify it directly in VR Portal. Alternatively, if the individual needs to complete onboarding tasks as part of the authorisation requirements (e.g., questionnaires, uploading documents), you can send them an onboarding invitation email for them to be recertified.
If you need to send an onboarding invitation email, refer to the instructions here.
For instructions on how to manually recertify the authorisation in VR Portal, see the steps below.
1. Click on the icon in the fit column for the individual you wish to recertify. The authorisation window for the individual will appear.
2. Click on the name of the authorisation that is to be recertified. The authorisation window for the authorisation and individual you are wanting to recertify will open.
3. Enter the Certified On date, or click the Today button on the right to fill the field with today's date.
4. Enter the expiry date for the authorisation into the Expires field, or click the 12 Months button to fill the field with the date 12 months from today's date.
5. Click on the Certify button to recertify the authorisation for the individual.
Reports are automatically sent to Site Administrators every Monday which list all authorisations for individuals and organisations that are due to expire or are not certified.
Authorisations are only reported on if the authorisation is set to Auto Notify.
For more information on Authorisation Expiry Reports, please refer to the knowledge base article: Authorisation Expiry Reports - An Overview.
For more information on Authorisation Expiry Reports, please refer to the knowledge base article: Authorisation Expiry Reports - An Overview.
Related Articles
Authorisation Templates
The Authorisation Templates page allows you to add and maintain authorisations that can be assigned to individuals or organisations requiring authorisation to be onsite. Examples of authorisations include site inductions, flu vaccination or permits. ...Authorised Organisations
You can manage authorisations at an individual and organisation level. When an individual signs in, VisitorRego will check the authorisation requirements for the individual and organisation. If either level is not compliant the individual will be ...Onboard Individuals
The Onboard Individuals page allows you to add and onboard individuals who require authorisation to be onsite. The purpose of this feature is to enable a site to easily welcome new individuals and inform them what they need to do to comply with site ...Auto-certify Individuals using Questionnaires
Authorisations can be set up to be automatically certified when an individual is onboarded. There are several ways in which individuals can be automatically certified through the process of onboarding. One of these ways is by having the individual ...Pre-Qualification for Individuals
The Pre-Qualification process enables individuals requiring onsite authorisation to self-onboard. This self-service approach removes the necessity for Site Administrators to manually add individuals, assign authorisation templates, and send ...