Database Connection Settings
VisitorRego uses a database to store and manage data. By default, it uses a built-in SQLite database, which is lightweight, requires no setup, and works seamlessly out of the box.
For organisations that prefer centralised management, SQL Server can be used instead. This option is typically chosen by multi-site organisations or those operating within a secure network.
Database settings are managed via the Database tab in System Setup. From here, administrators can view the current database configuration or click Change Database to configure connection and authentication methods.
Database settings are managed via the Database tab in System Setup. From here, administrators can view the current database configuration or click Change Database to configure connection and authentication methods.
Accessing Database Settings in VisitorRego
From VisitorRego’s Admin mode, select Options > Database tab.
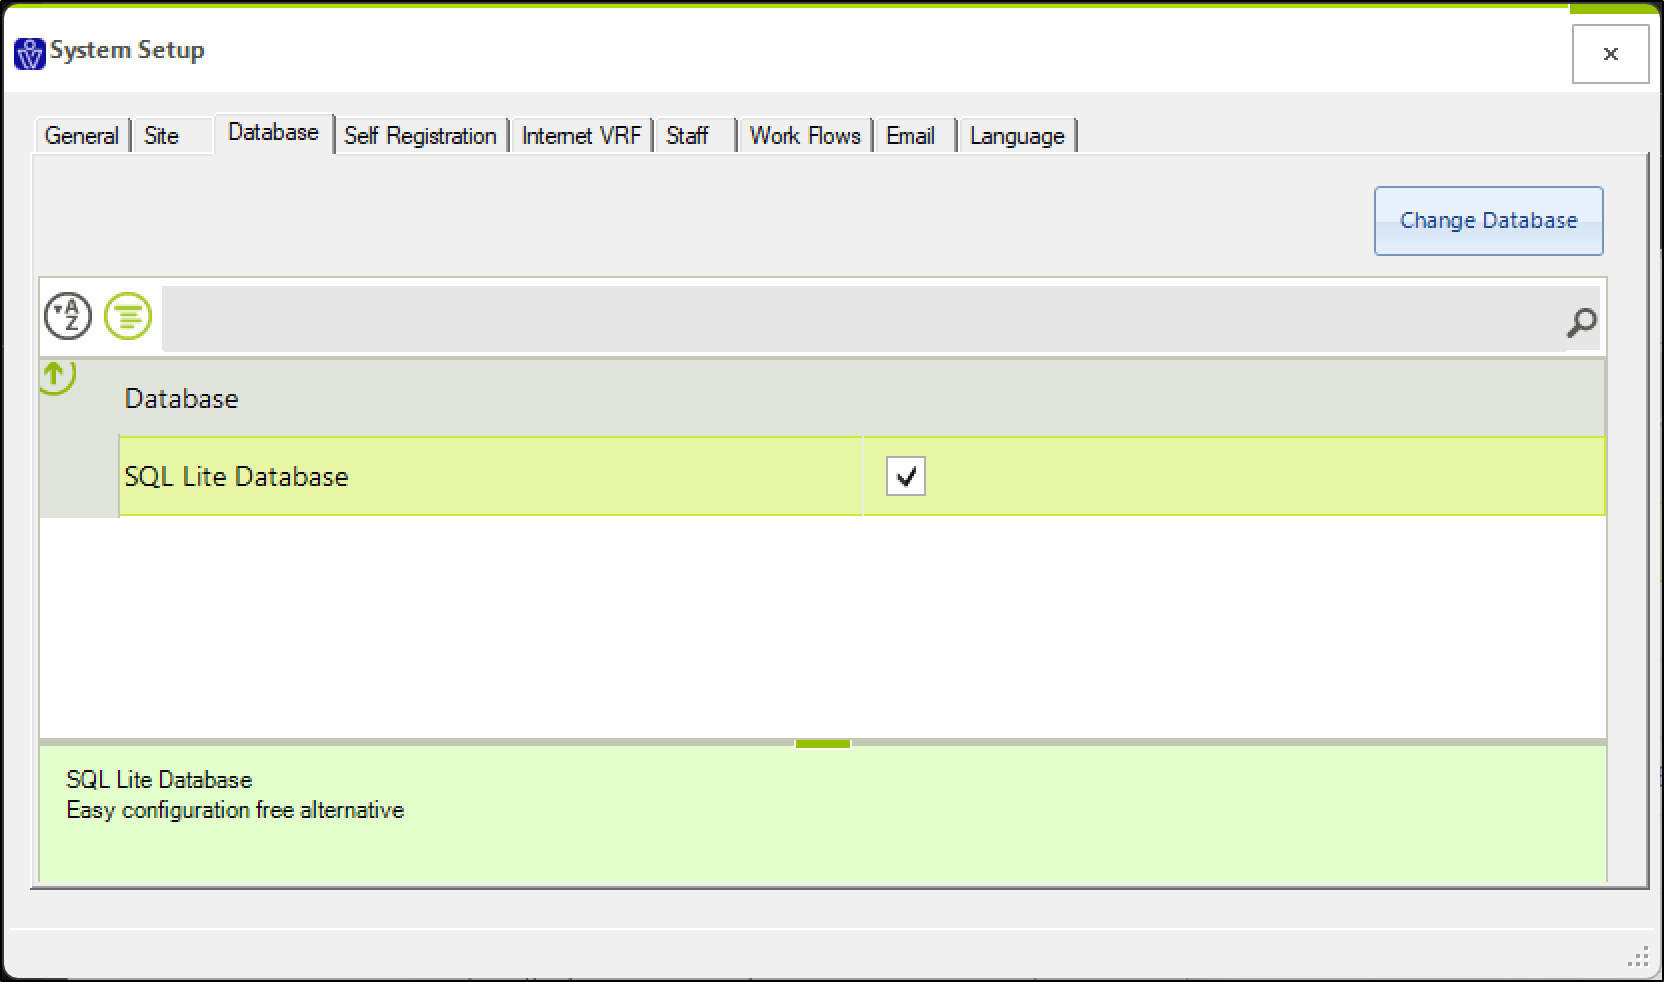
On the Database tab, you’ll see the current database configuration, including whether VisitorRego is using the built-in SQLite database or a SQL Server database. From here, you can also click the Change Database button to open the Database Setup window and update connection settings as needed.
On the Database tab, you’ll see the current database configuration, including whether VisitorRego is using the built-in SQLite database or a SQL Server database. From here, you can also click the Change Database button to open the Database Setup window and update connection settings as needed.
Database Configuration Options
When you open the Change Database window, you’ll see the main settings that control how VisitorRego connects to your database:
Command Timeout | The time (in seconds) that an SQL command will wait for a response before timing out. The default is 10 seconds. |
SQL Database Name | The name of the database VisitorRego will connect to. This setting is only applicable when using a SQL Server database. |
SQL Lite Database | When ticked, VisitorRego uses an embedded SQLite database (default). Untick this box to connect to a Microsoft SQL Server database instead. |
SQL Server | The name or network path of the SQL Server instance (e.g. SERVERNAME\SQLEXPRESS). |
SQL Userid | The username used to connect to the SQL Server database if connecting with SQL authentication. Leave blank if using Windows Authentication. |
SQL Userid Password | The password used to connect to the SQL Server database if connecting with SQL authentication. Leave blank if using Windows Authentication. |
VRF Primary Database | When set to True, indicates that VR Portal cloud server is the primary data source. Usually left as False for local setups. |
Windows Authentication | When ticked, VisitorRego will connect to SQL Server using the Windows account currently signed in. |
Using the Default SQLite Setup
By default, VisitorRego uses the built-in SQLite database, which requires no additional setup and works seamlessly out of the box. Data is primarily stored in the cloud and referenced locally through the SQLite database, ensuring it is always up to date and accessible across the system.
No database configuration changes are required when using the default SQLite setup.
No database configuration changes are required when using the default SQLite setup.

This setup is ideal for standalone or cloud-connected installations and requires no manual configuration.
Connecting to a Microsoft SQL Server Database
For organisations that require centralised management or multi-site setups, VisitorRego can connect to a Microsoft SQL Server database instead of the default SQLite setup.
Steps to Configure SQL Server
1. On the Database tab, click the Change Database button to open the Database Setup window.
2. Untick the SQL Lite Database option.

3. Enter the SQL database name into the SQL Database Name field.

2. Untick the SQL Lite Database option.
3. Enter the SQL database name into the SQL Database Name field.
4. Enter the SQL Server name or instance into the SQL Server field (for example: COMPANY-SQL\SQLEXPRESS).

5. Choose an authentication method:
• Tick Windows Authentication to use the signed-in Windows account.
• Untick Windows Authentication to use SQL Authentication.

• Tick Windows Authentication to use the signed-in Windows account.
• Untick Windows Authentication to use SQL Authentication.
6. If using SQL Authentication, enter the username into the SQL Userid field.

7. If using SQL Authentication, enter the password into the SQL Userid Password field.

7. If using SQL Authentication, enter the password into the SQL Userid Password field.
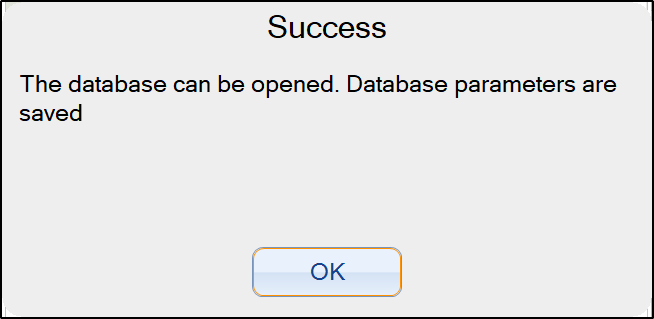
8. Once done, close the window. Changes are saved automatically.
When you close the Database Setup window, VisitorRego will attempt to connect to the database.
If the connection is successful: A message will appear saying “Success” The database parameters are saved when you click OK.
If the connection is successful: A message will appear saying “Success” The database parameters are saved when you click OK.
If the connection fails: After a short delay, a message will appear saying “Failed!” and provide the reason for the failure. You will then see options: click Yes to save the changes anyway, or Cancel to ignore the changes and close the window.
Related Articles
On-Network Database Integration
Maximise data security and internal control by integrating VisitorRego with your on-network SQL server through our On-Network Database Integration feature. This configuration establishes a centralised database for all VisitorRego units within your ...Dymo Printer Configuration
After setting up a label printer in VisitorRego, it is important to configure the printer to the correct label size that it uses. This article refers to the Dymo LabelWriter 450 Label Printer. Drivers for the printer should already be installed. If ...Brother Printer Configuration
After setting up a label printer in VisitorRego, it is important to configure the printer to the correct label size that it uses. This article refers to the Brother QL-700 Label Printer. Drivers for the printer should already be installed. If not, ...Seiko Printer Configuration
After setting up a label printer in VisitorRego, it is important to configure the printer to the correct label size that it uses. This article refers to the Seiko Smart Label printer 450 and 650 model. Drivers for the printer should already be ...Set Windows Firewall to allow port 1433 (SQL) connections (inbound and outbound)
If your site uses a remote SQL Server for VisitorRego’s database, Windows Firewall may block the connection between the VisitorRego unit and the SQL Server. Port 1433 (TCP) may need be allowed for both inbound and outbound traffic to ensure ...