Brother Printer Configuration
After setting up a label printer in VisitorRego, it is important to configure the printer to the correct label size that it uses. This article refers to the Brother QL-700 Label Printer.
Drivers for the printer should already be installed. If not, please request them by contacting VisitorRego Support.
To configure the printer, toggle out of VisitorRego to return to the Windows desktop, then open the Printers Preferences window in Devices and Printers.
A shortcut for Devices and Printers may be found on the desktop.
If there is no shortcut, navigate to Control Panel through the Windows Start menu. Under Hardware and Sound click on View Devices and Printers.
Once in the Devices and Printers window, right click the printer (touch and hold until you get a circle then release on a touch screen) and select Printing Preferences.
Click the Paper Size drop-down field to choose paper size Shipping Label and the Quality drop-down to Give priority to print quality 300 x 300 dpi.
Click Apply, then OK to exit.
Right click on the printer again and select Printer Properties. Navigate to the Device Settings tab, then click Utility Properties.
Set Power on when plugged in to ON and Apply the change.
Set Auto power-off time setting to 0 minutes and Apply the change.
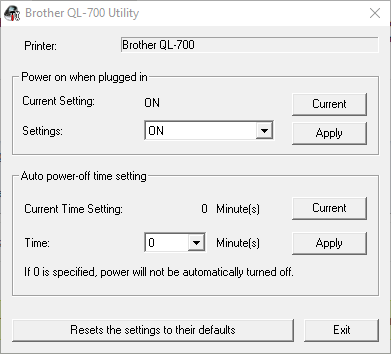
Click Exit to leave the Utility window.
Click Exit to leave the Utility window.
Click Apply, then OK to exit the Printer Properties window.
Make sure the Editor Lite light on the printer is OFF by holding down the small button on the front of the printer.

If the printer is disconnected from its original USB port and reconnected to a different one, Windows will view it as a different printer. If this occurs then the default label printer in VisitorRego will remain as the old printer and the printer settings will revert back to their default values.